

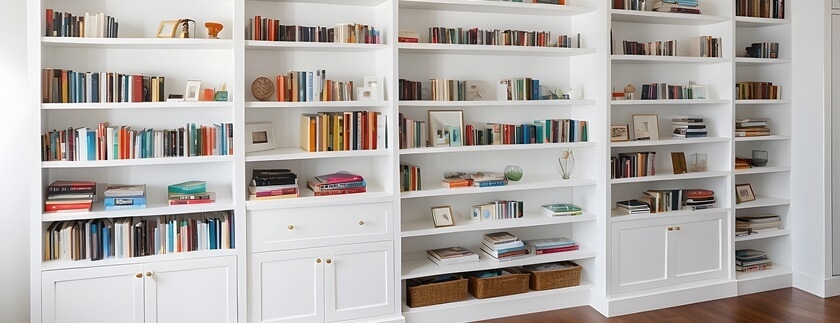
You might have seen the viral IKEA hack where you transform some pretty ordinary bookshelves into the book-tok library of your wildest dreams. Grab yourself some simple bookshelves, a bit of paint, and all the hardware to make it last forever, and get building with our easy guide.
Tools You’ll Need:
IKEA Bookshelves: We recommend going for either Billy or Kallax ranges but it's really up to you and what you need to store on the shelves.
Wall Brackets and Anchors: The safest way to secure your shelving to your walls.
Screws and Fixings: Depending on how you're customising the shelving you'll potentially need some extra bits and pieces to make it work.
Wood Trim or MDF Panels: This is if you're aiming for that built-in look.
Paint and Primer: This will be perfect if you want it to really look as though it's part of the room.
Pull Handles or Door Knobs: Again, depending on your customisation you might want to add doors.
Measuring Tape: You'll need this to make sure everything fits.
Spirit Level: A must-have for installing any shelves
Saw and Sandpaper: This will be used for cuttiing pieces and then smoothing them off.
Caulk and Wood Filler: A game-changer for making everything look built-in.
Paintbrushes, Rollers and Paint Trays: For adding the finishing touches.
Step 1: Planning the Layout
It’s best to work with your room here instead of making your chosen IKEA bookshelves work for the room. Measure your room and compare the sizes of different configurations of shelving. It can even help to put together a few small-scale drawings and cutouts of potential bookshelves so you can play around until you have a layout you’re happy with.
Don’t forget to plan your trims too. You can also add shelving, drawers, and cupboard doors for a fully customised look to your IKEA hack.
Step 2: Purchase and Build Your Bookshelves
Now it’s time for the flat pack to be assembled! Once you’ve purchased and transported your flat-packed bookcases to their final location it’s time to assemble them. This is where you’ll need to consider if you’ll be using the fixings provided or doing steps like leaving the back panels off to expose the walls behind them.
Step 3: Securing Bookshelves to the Walls
By far the most important part of this custom build is safety! Using brackets, fix every single piece of your bookcase to the walls so you can avoid any nasty accidents. Use a stud locater to find studs and fix the bookcases to them for extra security.
Whilst IKEA provides brackets with their bookcases you may want to add stronger ones that will give your customised furniture added strength.
Step 4: Add Your Trims or Surround
Now is the time to measure your trims or MDF panels that’ll be creating that built-in feel. Use a spirit level to keep everything nice and straight and always measure twice, cut once for the most accurate results.
You can secure your trim with adhesive or nails then use wood filler or caulk to fill in any gaps for the perfect, seamless look.
Step 5: Shelves, Doors, and More
This is your opportunity to be creative! Add doors, shelves, dividers, and more to make the bookcases really work for what you need them for. This is absolutely the best way to use IKEA furniture as you get the exact dimension you need for your individual needs without needing to employ an expensive custom woodworker.
Step 6: A Splash of Colour
Go bold with contrasting colours or finish off the built-in vibes by painting your bookshelves to match the rest of your room. IKEA furniture is notorious for needing a primer so dont skip this stage if you don't want your paint to peel off later. It's also a good idea to finish with a seal like Rockseal, to make it more hardwaring.
Top Tips
Definitely go into an IKEA store and see what options are available to you. Even if something fits in your room, it might be too imposing for your rooms dimensions so play around before you commit to a single range.
Add LED lights for dramatic spotlights on your prized possessions or purchase a custom book stamp for your very own personal library.